


One of my loyal readers recently asked me to explain how exactly daffodil hybridization worked, and how that leads to new varieties. I have written something about the subject once, but that was very brief, so here I will try to explain the process more thoroughly.
To start, I want to advice you that if you want to try to hybridize a daffodil: just do it! It really is not hard and if it does not work you won’t have broken anything.
All you need are two different daffodils, and a whole lot of … patience.

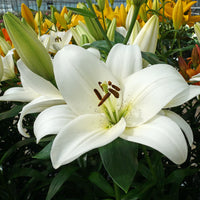
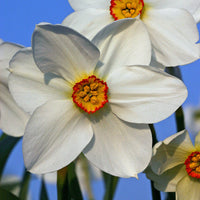
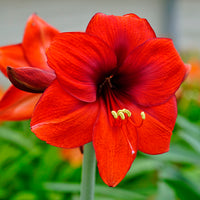
To get the Daffodil to produce new seeds, the flower first has to be pollinated. If you look straight at the flower, you can see that there are six anthers, with a pistil in the center. The point is to get the pollen of Daffodil A on to the pistil of Daffodil B.
You may ask yourself: Why doesn’t the Daffodil pollinate itself, with its pistil and the anthers with all the pollen being this close together? That rarely ever happens. Inside the flower, there is a sort of natural barrier that prevents the Daffodil from pollinating itself.
A lot of other plants do not have a characteristic like this, and therefore their pollen has to be removed in an early stadium if you want to use that plant for hybridization. The daffodil does not require her pollen being removed to prevent her from pollinating herself.
After you have put the pollens of your one Daffodil on the pistil of the other, all there is left to do is wait to see if your mission was successful. You can see this by looking at the ovary at the back of the flower. If this part starts to swell up, the beginning is there!
After the flower has died down, the ovary always lives for about a week or two longer, before dying, too. But if your pollinated Daffodil’s ovary remains green and grows larger, the pollination has worked!

Now you have to remain patient. You need to wait until the second or third week of June. If the ovary has coloured brown and has crumpled a bit, then the seeds are done. Now, you have to pick the ovary.
Make sure to that as soon as it colours brown, because if you are too late, the ovary open up by themselves, sending their seeds out into the world, and then you have lost them. If the weather is warm and dry, this may happen sooner than you want, so make sure to keep an eye on them.

Now keep the seeds in your home, in a box or a small jar, and keep them dry. You may notice that the shiny seeds may crumple a little as time goes by, but this doesn’t matter.
In September, the seeds can be planted in a large pot with a hole in the bottom. You can plant this pot in a secluded area of your garden. The edge of the pot should be above ground and the little seeds should have about one centimeter of soil on top of them. For the winter, you can cover the pot with some straw. You can remove this once the danger of night frost has disappeared.
If your other Daffodils come up in the garden that year, you will also see your seeds start to come to life. They will be tiny little things, smaller than one blade of grass. They can be anywhere from 3 to 5 centimeters tall at this point.

If the little seeds die down again, you can take the pot out of the soil, and keep it in a dry place in your shed. The tiny dots that have grown out of the seeds are best left untouched: they are too small still and if you try to dig them all the way out you will most likely lose a lot of them, or they will simply dry out. They are safest inside the pot.
When autumn comes around again, it is time to plant your Daffodil bulbs, and with those, it is also time to re-plant your pot full of seeds. This spring, you will see some of those blades of grass type of things, but also some leaves that are actually starting to look like Daffodil foliage!
The next year is the third year: you will be well trained in this course of action now, and you can repeat the process. But if your pot was full of Daffodil-like leaves in the second year, then this year, you will be able to take them out of the pot. The bulbs you are going to dig won’t look much like real Daffodil bulbs yet, but they are large enough to relocate at this point.
This autumn, you can plant the bulbs in another secluded spot in your garden, at about 2 cm deep.
It won’t be until the fourth year that the bulbs will start to look like actual Daffodil bulbs, but they are still way too small to give an actual flower, so you will have to remain patient a while longer.
In the fifth year, you may meet the first flower if you are lucky. In the sixth year, most of your own little bulbs will probably be in bloom!
Every flower you see is a different variety, quite like people: no two siblings are exactly the same.
Now the real fun starts, as you can begin picking your favourites. If you have an absolutely stunning one you are very welcome to email me a picture, so that I can come over and have a look.
So, I hope you have a fantastic time hybridizing Daffodils, and I will see you in six years.
Greetings from Holland,
Carlos van der Veek
PS. It has happened to me that after the first year after sowing, no Daffodil seed had germinated. If this happens to you, you can keep the pot dry in your shed and just replant her in autumn. The second year, the seeds will most likely come up anyway. I don’t know what causes this to happen, but I have seen the seeds just stay asleep for a year longer, and then the year after that they came up like nothing was wrong. So, my advice is to not throw them out right away if they’re not coming up in the first year. Like I said, you need patience.